
Everything below is simply lifted from their website (with minor tweaks) (Tech Perplexed / techperplexed.ga). We will not provide support for this.
So you're thinking of starting a media server on a VPS with infinite storage on a cloud service, but you have no idea where to start. This sounds like me, a few weeks ago - I found the installation absolutely daunting!
Fortunately for you I have done all the homework, and now sharing with you what I learned to get the system up and running.
If you follow these steps to the letter, you'll end up with
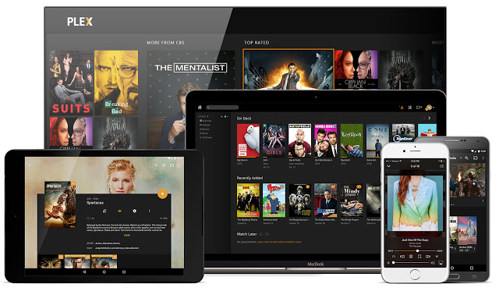
- A Plex or Emby server on a VPS of your choice,
- Unlimited storage on a cloud provider (this tutorial uses Google),
- A really good feeling of having accomplished something worthwhile!
What I will not be responsible for
- Your services. You will need to provide the domain, VPS and cloud services yourself,
- Your content. You will need to supply your own content and are solely responsible for what you upload to the cloud,
- Any loss of data, money, time or hair.
What you will need:
- A local computer to get set up. My tutorial is based on Windows 10 but if you're using a Mac or other system, that would work too,
- A little computer knowledge - you know how to use a mouse and keyboard and can find your way around on your local computer,
- Time, patience and a bit of perseverance. And you need a domain.
I mostly gathered the information from various Internet sources and the Plex forums, but I have also had some private help from friends (you know who you are). I can't thank you guys enough for your help and hope this tutorial will help some others to be up and running in no time.
VPS
A VPS is basically a computer away from home that offers various preselected (usually) Linux distros out of the box. You can then set it up with any service you like - in our case, Plex with an infinite cloud based storage system.
Choose a VPS service that is semi close to you - in other words, select a provider with data centers in Europe, North America, Asia or wherever you happen to live. If you are given a choice, pick KVM (instead of OpenVZ)... it might be slightly pricier, but will also be more stable and faster.
These are the minimum specs you will need in order to stream HD content comfortably:
- 2 CPU cores
- 8GB of Ram
- 40GB disk space
- 4TB transfer
The above are the absolute minimum requirements for a single user/stream. If you have multiple users on Plex, or more concurrent transcoding streams, go for a service that offers at least 4 CPU cores and 16GB of RAM.
If you own a gigantic media library (thousands of movies, hundreds of TV shows, etc) or if you are going to use your VPS for downloading content, you might need more than 40GB storage because each media item will take some space to store its metadata and cache.
If you want to use your VPS to copy or sync files between cloud services, you'd want to look for one that unlimited bandwidth and generous rules on network usage.
Cloud
Next, sign up with the cloud service(s) of your preference. I picked Google Gsuite Business as my main service. The reason is that at the time of this writing, they are the most cost effective at $12/month + the cost of a domain. This tutorial will teach you how to set up Google with Plex and/or Emby to basically create an infinite media drive.
Upload your content
While you are are getting ready to setup your VPS, you might as well upload a few movies/TV shows to your cloud service. There are various tutorials on the Plex website on how to set up your media for usage with Plex. I also assume you know how to upload files to your cloud service, so I won't be covering those subjects in this tutorial.
Lastly, this tutorial does not cover data encryption. If this is a concern, you will be able to find numerous sources on the web that will explain the ins and outs of encryption.
PuTTY
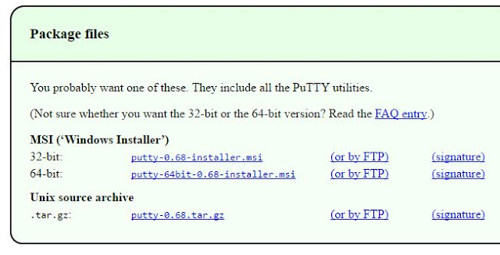
You are almost ready to begin your Linux adventures. You will need PuTTY in order to connect to your VPS. You can download it here: http://www.putty.org/
You will need to install it on your local computer so pick the package files suitable for your system.
You'll be using PuTTY every time you have to access your VPS, so you might as well place that icon on your desktop.

We'll learn how to use the terminal throughout this tutorial.
Linux
This tutorial is based on Ubuntu 18.04 the 64bit version, which currently is the latest version of what most VPS providers offer. Also, Ubuntu is one of the most popular Linux distros. If in your enthusiasm you already picked a distro when you signed up for a VPS, fret not... most providers allow you to easily rebuild your server.
FUSE
Last but not least, for our setup we need FUSE enabled. Many budget VPS services do not enable this by default, but will do so on request. You will need to open a ticket and submit a request so that your new provider enables FUSE for you.
Connecting to your VPS
Start PuTTY, you'll see a configuration screen.
Enter the IP address your VPS provider supplied you with, enter a descriptive name in "Saved Sessions" and hit "Save". Leave Port 22 as it is.
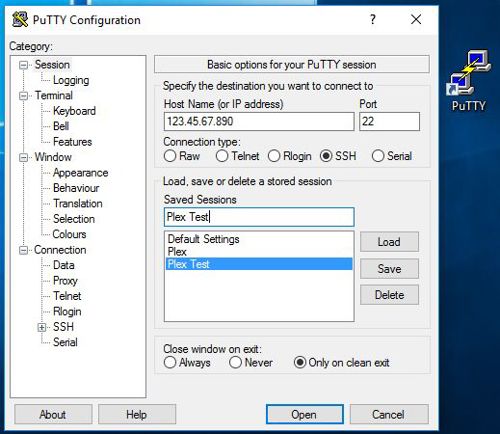
PuTTY will now remember your credentials for next time, always handy!
Next, click "Open". You'll probably get a very scary warning about a potential security breach. Don't panic, it is okay, that always happens the first time you access your VPS from a new location. You can safely click "Yes".
The first time you login, you need to use the password your VPS provider gave you.
Now, if you wish you can copy (Ctrl-C) that password so you won't have to type it out when you need to enter it.
Then go your black PuTTY terminal. Behind "login as" you need to type:
root
Hit the Enter key. It will ask you for your password. Do not enter Ctrl-V! Resist that temptation - it won't work. Don't say you weren't warned... just... you know... don't.
Instead, right click with your mouse button inside the terminal. But... nothing happened? Yes, your password that you copied before was pasted invisibly. Hit the Enter key and if all goes well, you'll be presented with this screen:
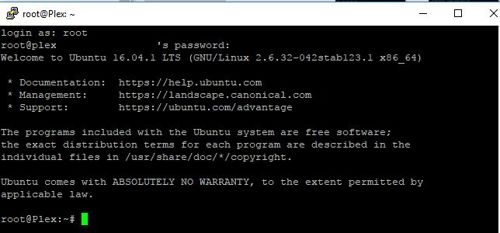
Admire that splash of green in an otherwise black and white world... that is your cursor.
Continue with Part 2 - Configuring Ubuntu
Comments
Recent Posts


Categories