
So in continuation of my how to create and attach a new drive to a Hyper-V Virtual Machine post, below I will explain how to make this drive usable in Ubuntu 19.10.
So the first thing we need to do, is locate the name of the drive we just added, and we do that using lshw, this should already be installed but if not you can install it by running:
sudo apt install lshw
Once installed we want to see all the attached hardware of type disk, so we do that by running:
sudo lshw -C disk
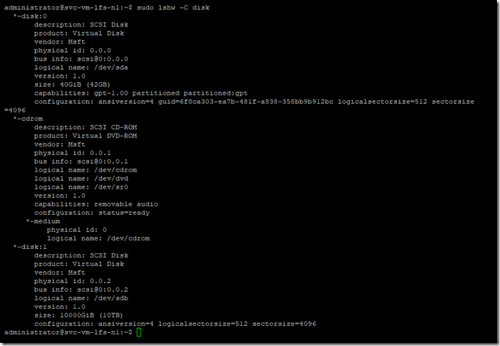
We can see that we have 3 drives, one of which is a DVD drive.
We can find the new drive easily, as it is lacking capabilities and GUID.
You need to be 100% confident you have identified the correct drive before continuing, the following commands will wipe any data on the drive.
We are going to use parted to setup the drive (Be sure to change the below to your drive name):
sudo parted /dev/sdb

Type the following to create a gpt partition label
mklabel gpt
You may receive a warning that all the existing data and label with be destroyed. If this is a drive you are reusing and happy to lose all data then proceed.
Next we want to set the units with the following:
unit TB
Then create the partition (Change 10 to the desired size):
mkpart primary 0 10
To check the created partitions use the following command:

At this point we will create the desired file system, we are going to create an ext4 file system:
sudo mkfs.ex4 /dev/sdb1
Depending on the size of the disk this can take a little while
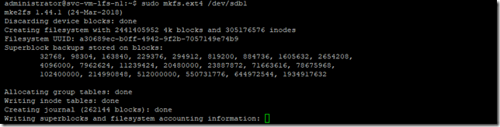
One completed it will look like this:
Now we need to mount /dev/sdb1 so that it's usable.
First we need to create a folder which will be used to 'attach' the drive to (you can call it whatever you want):
sudo mkdir /data
Then we will mount the drive to this folder:
sudo mount /dev/sdb1 /data
We can then look at all the attached disks:
df -h
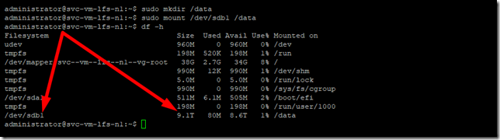
We can see our new disk.
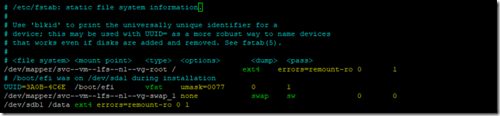
Next we need to set it to auto mount on boot, to do this we need to modify the file system table (fstab)
sudo nano /etc/fstab
We then need to add a new line to the bottom of the file:
/dev/sdb1 /data ext4 errors=remount-ro 0 2
Next reboot your server, and if every thing is correct you should be able to access your new disk and write to it.
Comments
Recent Posts


Categories