Everything below is simply lifted from their website (with minor tweaks) (Tech Perplexed / techperplexed.ga). We will not provide support for this.
Now that you finished Part 3 - Install and configure Plex, we're halfway there... keep with it! This part will discuss Rclone.
Installing Rclone
Installing Rclone itself is the easiest part. You don't even need to understand what is happening. After you have followed these steps to the letter, Rclone will be installed.
I suggest you start a new session in PuTTY (select your saved session and click "Open", then log in with plexuser (or the name you picked for yourself) so that we are no longer in local mode.
Copy and paste the following line:
curl https://rclone.org/install.sh | sudo bash
That's all, Rclone is installed and ready to run!
Configuring Rclone with Google
You didn't think everything would be this easy, right? No, the hard part is still to come. Now we need to configure Rclone, which is a bit of a task because on our PuTTY terminal, we have no browser available. Not to worry, with a bit of work, your own local computer will come to the rescue.
In the PuTTY terminal, type
sudo rclone config
You will be presented with a choice, type the letter n for "New remote" and hit the Enter key.

This tutorial will cover Google Drive, which is by far the most popular service. If you have signed up for another cloud service, check the Rclone website how to set that up.
You are asked to give a name. For this tutorial to work properly, please make sure you type:
Gdrive
Notice the capital G in Gdrive - Linux is picky about these things. Again, to avoid problems, you should not deviate from this (unless you exactly know what you're doing, but then you probably wouldn't be following this guide).
Check which option mentions Google Drive "drive" in the list (in the latest version this is #11), so type 11 and Enter.
Leave client_id> blank, just Enter.
Leave client_secret> blank as well, just Enter.
Scope that Rclone should use> 1 (full access)
ID of root folder> blank, just Enter
Service account files> again leave blank, just Enter.
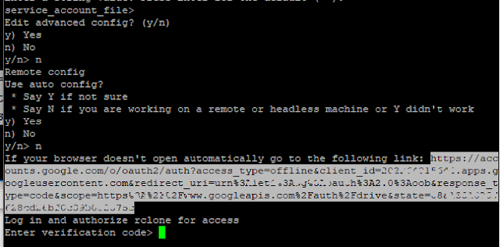
Type the letter n for No, you don't want to use auto config and Enter.
You'll get a message that if your browser doesn't open, you will need to copy and paste the following link. You will need to place the entire link in a block by dragging your mouse (see screenshot below). Do not hit Ctrl-C - remember, this is PuTTY - dragging the mouse and placing the link in a block means it's copied.

Go to your local browser and paste the link. You will be asked to log into Google and accept authorization. You will then be given a code to paste in PuTTY.
Paste the code (right click), hit Enter.
Next you will be asked if you want to configure it as a team drive. Unless you know exactly what this means, type n - you don't want it.
Finally type y that Yes, all is okay and then q to Quit config.
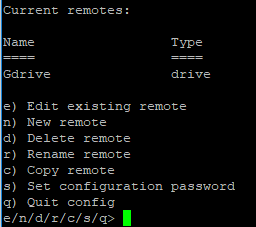
You should see both drives in your list of current remotes:

Head over to Part 5 - Mounting the drive(s).
Comments
Recent Posts


Categories

