In this blog post, we will be deploying to our Cloud Umbraco Hosting service using WebDeploy from GitHub Actions.
To begin you will need to download the Web Publishing profile from our control panel (SolidCP).
- Head to SolidCP
- Click the Hosting Space Menu on the left-hand side of the control panel
- Then click Web Sites
- Find the website you would like to use Web Deploy with and then click on the name
- Click Web Publishing on the tabs found in the centre of the control panel
- Enter a password and click Enable (You can skip straight to point 7 if the service is already enabled)
- Download the profile by clicking on the Download Publishing Profile for this website button
- Open the download file in Notepad or Notepad++
Next, you will need to create a folder in your GitHub repository called .github within this folder, you need to create another called workflows.
Repository root -> .github./workflows
Within the workflows folder create a new file called main.yml (or whatever you wish to call this build and release workflow).
We will use our GitHub Action called UmbHost Web Deploy specifically version 1.0.1.
Below you will find a basic starter workflow to work from:
Do not commit the workflow yet.
Working from top to bottom, you must configure a few things before running the workflow.
The first change is on line 5, change main to the branch name which you would like to use to trigger the workflow.

Next, you will need to create some secrets in your repository, you can read documentation about secrets on the GitHub website here.
Browse to: Repository -> Settings -> Secrets and variables -> Actions

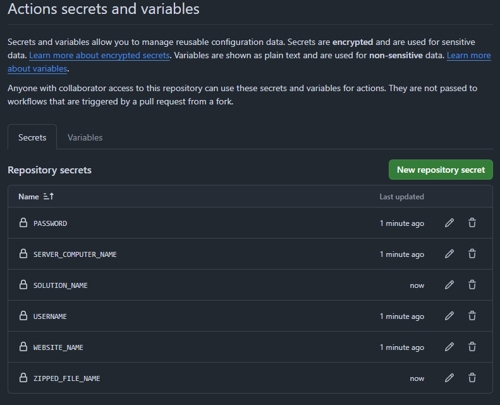
Next, you will need to create the secrets which are used in the workflow, click on the New repository secret button one at a time, following the table below as a guide, you can find the values for the Publish Profile Key in the previously downloaded Publish Profile file.
| Publish Profile Key | Secret Name |
|---|---|
| publishUrl | SERVER_COMPUTER_NAME |
| msdeploySite | WEBSITE_NAME |
| userName | USERNAME |
| userPWD | PASSWORD |
There are two more secrets you need to create:
SOLUTION_NAME -> This is your solution name including the .sln extension
ZIPPED_FILE_NAME -> This is your web project name replacing the .csproj with .zip, for example if your web project is called Umbraco.Web.csproj then you would enter Umbraco.Web.zip
It should look like the picture below once all the secrets have been created:

Once the secrets have been added, you can now commit the previously created GitHub Actions file.
You can now sit back and watch the action run by clicking on the Actions tab in GitHub then on the name of the run and finally on the build link.
The workflow example used in this blog post is only a basic starter workflow, you can do so much more such as adding in your frontend build steps, making environment-specific settings and configurations and so much more.
Comments
Recent Posts


Categories


